Monday, December 24, 2012

Assign "Elastic IP" Fixed Public IP to your Amazon EC2

Amazon AWS EC2 Elastic IP 2012-12-24_07-15-34
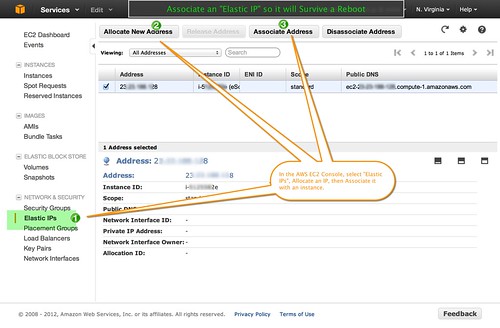
Amazon AWS EC2 (Elastic Compute Cloud, or basically, paravirtual servers you can rent from Amazon) initially assigns a non-fixed public IP address to your server instance. This means when you reboot your instance, the public hostname and public IP address will change. This is fine when you are experimenting, but not fine for a production server, and can be the source of not a little surprise, when you restart and the server "disappears". 

This behavior is by design, and makes sense, because IPv4 IP addresses are relatively scarce and a large provider like Amazon would need to conserve on them where possible. But if you need a fixed IP, Amazon allows you to assign what they call an "elastic IP" address. The beauty of this design, is that the elastic IP is associated with your account, and not locked to a single instance. You can re-allocate it from server to server. 

So, say you have a production server in the Tokyo AWS region, and a backup server with the same configuration but that is idling in the US East AWS region. If for whatever reason, the Tokyo EC2 region or your server there has an outage, you theoretically could just visit the AWS EC2 console, and re-assign that elastic IP from the Tokyo server to the other server, reboot and you're on your way. Issues of DNS changes and propagation are therefore not a factor, and you have pretty quick failover.

The screenshot shows what the interface for allocating these looks like. 

Wednesday, October 10, 2012

Apple OS X "Mountain Lion" Upgrade

There is not much over-the-top wow about the OS X 10.8 "Mountain Lion" upgrade, and it seems like the small upgrade fee goes to more subtle changes this time around. The upgrade itself was uneventful, but took a while due to database changes in Mail and Calendar, which needed to convert.

As for functionality after the upgrade, here are a few things I found to be worth remembering - 

  • More apps that work with Retina displays. Personally, I am all for better displays, and am pleased with the Retina displays on both my MacBook Pro and iPad. There are some apps, such as Acrobat X which render fonts horribly on a Retina display, but Preview still works for displaying PDFs. I am hopeful for Acrobat XI.
  • Safari finally has a combined address and search bar, like Chrome, and also lets you pinch-in to make the open tabs act like on iOS. 
  • Really solid integration between the OS and social networking services Twitter and Facebook. Check out the nice integration in Address Book. You can also share to Flickr from a Quick Look popup. Try going to System Preferences, Mail/Contacts/Calendars, add your Twitter account, and click "Update Contacts." It is quite convenient to be able to grab Twitter handles and Facebook profile photos. 
  • You can rename files from some apps now. Notice the drop down menu to the right of the file name, in say, Preview.
  • There are Sharing actions you can take from Quick Look. Press space with a file selected in Finder, then use the sharing icon. Also, find the sharing icon in other apps, such as Preview, Notes, Textedit, Safari as well. You can share entire web pages via email, in Safari now. 
  • Double tap/click in the Sort By bar at the top of Mail's message list, to jump to the first message. Much easier than grabbing those fiddly scroll bars, and is something I have wanted for a long time. 
  • Speaking of Scroll Bars, they now grow under your mouse to let you grab them. 50% less fiddly, compared to previous iterations. 
  • Gatekeeper is a good change and requirement, I think. Apple have made it a little more difficult to run apps from unknown sources. See System Preferences, Security and Privacy. 
  • Dictation is pretty cool, if you turn it on (System Preferences, Dictation) but note that it sends data to Apple's servers, and requires an Internet connection. 
  • You can search directly from Launch Pad, but I still just use the Spotlight icon and type the name of the app, to search for it. 
  • Calendar (previously iCal) seems to work better with Google Calendar. I gave up on iCal in Lion, and switched to BusyCal, but I might give Calendar a try once again. 
  • Message center is irritating, to me - I am not a fan. I like Growl better, and I had to mess around with Calendar delegates, otherwise I was getting popup reminders for all the staff in my company. Maybe it will grow on me. I will give it a chance. 

Hope you find something you can use. Enjoy!

Sunday, June 10, 2012

LinkedIn Listing eSolia and Other Tokyo Companies Incorrectly

I pointed this out to LinkedIn 10 days ago, but am getting nowhere with support who seems to think I will just let it drop hearing their platitudes, so I will post about the problem here in the hope that another company with a similar problem will join me in requesting a fix.

Linked-In has re-located us outside Tokyo...

The problem is, when I enter search phrases that bring my company eSolia up in search results, we and other like companies are listed as being "outside the 23 wards of Tokyo." You can see it in the screenshot attached below. This is the exact opposite of the reality - we are inside the 23-wards, and to me, it just seems like a programmer got their logic switched up. 

LinkedIn support informs me as follows - 

I sent your message to our research and development team for review and consideration in future developments.

Even though we’re not able to respond individually to numerous recommendations we receive, we’d like to invite you to check out the LinkedIn Blog http://blog.linkedin.com for the latest notifications on site improvements. It’s our way of keeping you and our other members informed on all the exciting work we’re doing behind the scenes.

We appreciate the feedback and believe that together we can create great products for everyone!

Seriously?! Well, gee, I am so happy that maybe someday, you will get your act together and maybe deem it worthy to fix your bug. 

Please LinkedIn, this seems like a simple logic error that is happening to multiple companies in various places inside the 23 wards of Tokyo. We hope for a fix sooner rather than later, or I will have to go to my landlord and request a rent reduction, as my company has been relocated outside the 23 wards of Tokyo. 

Anyone else having search listing problems with LinkedIn? Log in and contact their support via this page - http://help.linkedin.com/app/home. 

LinkedIn - Incorrect Locations for Tokyo Companies

Thursday, May 10, 2012

OS X Lion 802.1q Tagged VLAN Setup

Apple obviously works hard to make things as easy as possible for users, but sometimes in their zeal for simplicity, technical things that should be represented simply in the GUI, are actually made more difficult and opaque. 

One such example is setting up 802.1q VLANs in OS X Lion 10.7. In  System Preferences, Network, you can use the gear icon at the bottom of the interface list, to Manage Virtual Interfaces, but you can only link a vlan you create there (or in the CLI) to the main Ethernet interface, and not to any secondary interface you create. However, it is indeed possible to create the vlan on the main interface, then give it the IP address you require. 

How to Setup an 802.1q Tagged VLAN in OS X 10.7, with a Manual IP Address

The reason I needed to have a tagged VLAN, is my switches' management interface is on a tagged VLAN. We are using an untagged VLAN as the general VLAN in our network, because you never know what systems will not support 802.1q tagging, and, you can have only one untagged VLAN in a switch infrastructure. (That makes sense if you think about it. How could you have two untagged VLANs, when the point is separation.) We wanted the security of a separate VLAN, for infrastructure management functions. 

So my goal was - 


  • to have a single NIC working for all the networks I need. 
  • to be able to connect to our standard untagged internal VLAN where we have servers and printers, on 10.81.1.0.
  • to be able to connect to our tagged management VLAN which is the only way to manage our switches, on 10.81.254.0.


Connecting to the standard untagged internal VLAN is easy. It is the "Ethernet" interface listed in System Preferences Network, and connects via DHCP. The steps to make the third bullet point work, were as follows -

First, open System Preferences, Network, then use the gear icon at the bottom of the list of interfaces, to see a submenu, that has "Manage Virtual Interfaces". 

OS X 10.7 802.1q Tagged VLAN - 1OS X 10.7 802.1q Tagged VLAN - 2

Click on "Manage Virtual Interfaces" and use the plus button to add the VLAN interface, entering a name, and the correct VLAN tag number. In this example, it is 254. At least on my MacBook Pro, I was able to select only the one physical NIC - Ethernet - to bind the VLAN to. 

After you click Done, you will see the VLAN interface listed in the main list of interfaces. You then select this, and change DHCP to Manual configuration, and set it up as a normal Network interface. The difference is, this interface has the 802.1q tag on all its packets. 

OS X 10.7 802.1q Tagged VLAN - 3OS X 10.7 802.1q Tagged VLAN - 4

Once this is set up, you will be able to communicate with other devices, like switches, servers, or storage, that have the same VLAN tag. 

I hope this information helps someone. Enjoy!

OS X 10.7 802.1q Tagged VLAN - 1OS X 10.7 802.1q Tagged VLAN - 2OS X 10.7 802.1q Tagged VLAN - 3OS X 10.7 802.1q Tagged VLAN - 4 


Sunday, January 08, 2012

Efficient Gmail with OS X Mail.app

1000 Cranes - one by one effortGreetings and Happy New Year. I am using Mail.app on OS X Lion, to retrieve mail in my Google Apps for Business Gmail account, and I wanted to blog about my setup, because I think it is relatively efficient and might help others. My goals are:

  • To keep my inbox small, to allow Mail.app to perform well. This goes for any mailer, really. The larger the mail store, the slower it will get.
  • To keep minimize network traffic and keep round trip copying up and down to Gmail, to a minimum.
  • To be able to have a backup of mail just in case, outside the mail client.

My Formula for Mail.app Gmail Efficiency

Here is what I am doing:

To minimize network traffic, in GMail settings, I uncheck the "Show in IMAP" setting for the All Mail label, so that it does not copy down to Mail.app. If a message comes into Gmail, and this is turned on, it will download twice - to the Inbox folder and to the All Mail folder. Gmail does not store in folders, but rather works with labels, so there is some strangeness in interaction with typical IMAP clients as a result.

To keep the size of the local Inbox small, I am Archiving mail. Archiving mail in Gmail means to remove its Inbox label. It is important to note that when you Archive mail in Gmail, it just makes it disappear from the Inbox, but it is still present in All Mail.

To Archive inside the Gmail web GUI, select or open the mail, then -

  • … press "e" on the keyboard (see other keyboard shortcuts for Gmail). Or,
  • … click the Archive button on the toolbar (looks like a box with a downward-facing arrow).

There is an Archive button in Mail.app, and what this does is to move the selected mail into an Archive IMAP folder, which will be synced up to Gmail. To Archive mail using Mail.app, select or open the mail in Mail.app, then -

  1. … press Ctrl-⌘-A to Archive it.
  2. Confirm the email is present in the local "Archive" IMAP folder, which should be present in your Gmail folder list (in Mail.app, scroll down, in the left-hand folder list to find it).
  3. In Gmail, once the email is copied up and synced, select the mail or mails and click the "Remove Label" button, or, press "y" on the keyboard. Use Mail.app menu Window, Activity to confirm the sync, and, observe the labels in Gmail. At first, you will still see all the mails in the Archive label marked with an Inbox label as well, but, as they are synced up, these will be removed. Once it settles down, you can Remove the Label.

Why do it this way, taking more steps? I do this because it is easier to search and select in Mail.app, than it is in Gmail. You can search on a date range in Gmail, but it is a bit fiddly.

To keep a backup of mail, just in case, I use the excellent MailSteward utility. This lets me automatically keep a database of all my mail, which I can then periodically offload to DVD, Amazon S3 or Dropbox.

Bonus Tip

If you are happy deleting unneeded mail in Gmail and not Mail.app, then you can uncheck "Move deleted messages to the Trash Mailbox" in preferences (Mail.app, Preferences, Select Account, "Mailbox Behaviors"). This way, when you delete on Mail.app, the mail is removed from the Inbox on your local system, but, only the Inbox label is removed from the message up in Gmail. You would then have to go to Gmail and delete what you want to delete.

I hope these tips help someone.

Thursday, October 20, 2011

Turbulence during iCloud Restoration to Replacement iPhone 4

My firm purchased the Apple "Joint Venture" service, which allows us to register our iDevices, and get priority support from the Geniuses at an Apple Store, as well as training. The home button on my iPhone 4 went wonky on me, and would not react in the normal way when pressed. So I called the JV guys up. They told me it is a typical problem, and offered to replace my iPhone in-store, since it was still covered by AppleCare.

The next day I went to my Genius appointment at the Ginza Tokyo Apple Store, and though I showed up early, they still took me, and got me set up very quickly. There were still crowds from people wanting to get the new iPhone 4S, so the Genius Bar was packed, but the JV status allowed me to get serviced immediately, which was nice. Shinji, the Genius who helped me, also set up the phone with iOS 5, so I could just get to the restoring. I was out of there in less than an hour, and bought an Apple TV on the way out, so I guess Jobs' charm is still working on me!

Restoring an iOS 5 Backup to a new iPhone 4

I took the half-setup phone back to my office, got on WiFi, and started the restore from iCloud. Basically, the settings did indeed come over, but after about an hour, I got an error saying that it could not restore everything and that I should restore from iTunes (I am not sure whether that is normal, or a problem). I also had a few prompts to enter my iCloud credentials (Apple ID and password), for whatever reason. I kept re-entering, and it finally stopped asking.

I had backups in iTunes, so I restored from that, but that did not fully work either. I had to de-attach and re-attach the phone to iTunes, then click Sync in iTunes, to get it to fully install my purchased Apps. Finally it did work, but I am not sure what VooDoo caused that.

Despite the speed bumps along the way, basically, I was able to get my iPhone 4 restored. A couple of points:

  • Even if you are backing up to iCloud, it is really too new to trust, so make a manual backup. Connect to iTunes, then ctrl-click on your iPhone or iPad icon in iTunes, and choose backup from the popup menu. This will force a manual backup to iTunes locally, which can be restored from.
  • When you are going through the restore process, persevere, even if prompted for your password multiple times.
  • After you restore from iCloud if that is the route you are taking, you will need to restore at least Apps directly from iTunes.
  • Once you restore everything, you will need to re-enter passwords for things like Mail and so on, so have those handy.

I hope this helps someone facing the same problem. Enjoy!

Saturday, September 03, 2011

Softbank iPhone 4 Emoji Keyboard Troubleshooting

Softbank iPhone emoji keyboardMy daughter came to me with an interesting problem with her iPhone, so I thought I would share what I learned and how I fixed the problem. The problem was, no matter what she did, the "emoji" (graphical emoticon icons) would not show up in her email app. I rarely use emoji except when emailing or texting my daughters, so I had to jump in and learn about it.

How to Fix the "Emoji Keyboard Does Not Appear in Mail" Problem on iPhone 4

First, I wanted to define the problem:

  • When pressing the globe icon, the emoji keyboard does not appear but it should. You can long-press or repeatedly tap the globe to get the choices to appear and indeed, it does not.
  • The emoji keyboard appears on "everybody elses" iPhone, meaning the teenage friends of my daughter ( :-> ) but just to be safe, I checked and indeed, it works for the other iPhones in my family as well, but not on hers.
  • More specifically, I can get the emoji keyboard to appear on my iPhone in the mail app, when I choose the Softbank IMAP address as the From: address and a cell phone recipient as the To:.
  • The emoji keyboard appears on my daughter's iPhone in the SMS/MMS app, as expected.

What I learned as I went along:

  • There are a whole lot of apps that purport to allow you to have emoji on your iPhone without jailbreaking, since the codes are apparently built into the IOS. Mostly they seem to have not-so-good reviews on the iTunes app store. However on iPhone 4, it appears that you just need to turn on the keyboard in Settings, General, Keyboard, International Keyboards. There is a keyboard which is specifically called "Emoji", and there are no advanced settings - it is just a toggle. I have no way of testing whether this keyboard is available for users outside Japan, since we are locked into Softbank as a carrier here.
  • There's a lot of voodoo out on the Internet about this problem, because a lot of people are having it and blogging about it: restart, uninstall, reinstall, sprinkle some eye-of-newt, shake-the-phone-twice-and-pee-on-your-neighbor's rosebush and so on. I tried the restarting since it is non-invasive but, until I resolved the main issue (later), restarting did not help.
  • The official documents say that emoji are compatible only when you send email to other carriers that support it, and, it appears it is also possible to use with Gmail and other IMAP servers, but not POP. I read that you have to choose the right email account, to be able to send from, in your mail app (again, not SMS), and also to a recipient who can accept the emoji. Somehow, Softbank seems to have got code added that limits the behavior of the keyboard selector, based on what you choose in your From: and To: in the mail app.

So as I was thinking about the third point, I thought I had better check the mail account settings, because we had set up a few different email accounts on the phone - the Softbank IMAP account that comes with the phone contract, an IMAP account and a Gmail account. Turns out that switching between all of these as the From: yields the same result - no emoji keyboard.

In the most important email account in this case, the Softbank IMAP account, I noticed that there was no main SMTP server set but that the Softbank SMTP server was indeed selected (and, mail was working fine save for this problem). When I set the Softbank SMTP server as main for the account, and restarted the iPhone, it started working. Now she can switch to the emoji keyboard as expected.

There is something in the code that controls how the emoji keyboard appears or not, based on the SMTP server that is selected, so be sure to enter the Softbank IMAP SMTP server as main, for the Softbank IMAP account you get with your contract.

The Cause of All This Strife

I believe the root cause of this problem is the automatic installer that Softbank recommends you use when setting up. When I logged in and tried setting up with it, it did not install correctly, failing to set SSL to ON, and I had to get in contact with Softbank about that one. I think that the installer also sets the main SMTP incorrectly, and is ultimately the reason so many people have this problem.

Besides being extremely lazy about this, since their auto-installer does not work, Softbank engineers are thinking too much but not enough, and ultimately causing trouble for their customers. They are trying to "make it simple" by providing an automatic scripted solution for people to get set up, but as Apple surely knows, automation like that is one of the hardest things to do because you have to consider so many angles. Better to simply leave it up to the user to learn that: "emoji work only with email accounts that can read them" because they not only did not get the installer right, they ultimately caused a greater problem with emoji not working for many.

I hope this little post helps someone out there with their emoji issues.

Saturday, July 23, 2011

OS X 10.7 Lion and Lion Server Upgrade Notes

In this post I will share my notes on the upgrade from OS X 10.6 "Snow Leopard" to 10.7 "Lion". This is not meant to be a comprehensive review but I hope someone can find some benefit in this information. I am an early adopter in most cases and a software lover (fanatic or addict might be a more appropriate adjective!), so I bit the bullet for this upgrade as soon as I could get it, knowing that I would be in for some trouble here or there. As for my background, I am a technologist mostly on the management side these days but do have a clue, and since I am not doing OS X or iOS development nor did I have time to read too much about Lion before the release, these notes represent fairly fresh eyes on the product.

Generally, my upgrade from 10.6.8 to 10.7.0 went smoothly and without trouble. Developers of the software I use were on the ball, and had apps ready for Lion either off their sites or in the Apple App Store. Kudos to them and to Apple for all the hard work. Make no mistake, software is truly hard work, and to make things appear easy and to "just work", like Apple often does, requires massive effort. If it looks easy, the guts of it are hard, in the world of software. There are no magic wands, although it might appear that way.

OS X 10.7 Lion

I thought the download would take forever, but it was relatively quick after making the payment in the App Store. I feel the low price is more than fair; generous even, given the value provided. I did two systems: my home system and my work system, paying for those separately. The morning download at about 7AM JST was fast, while the late afternoon download at the office was slower. Either way, it is a 4GB download.

I retrieved the file that had downloaded to the /Applications folder, before I clicked "Install", for safekeeping, and copied it to a USB stick. There is a way to convert a USB to a bootable disk to use for reinstallation, so I will revisit and do that later.

After clicking Install, the time to install was similar to past experiences with OS X upgrades. Breakfast eaten and paper read, I went back to look, and the system had rebooted into a login screen with a nice-looking "textile" background; very attractive. I used my usual account to log in, and after some grinding of gears (caches and such being created I imagine), everything pretty much came up as expected.

After the install and logging in, my first impression was that this release is a definite paradigm shift towards a more iOS like experience on OS X, given features like Launchpad and Mission Control. These take over a bit of the market share for small development houses making utilities to do a similar thing albeit in a more advanced manner. QuickSilver, LaunchBar and Spaces come to mind.

Some apps do conversions the first time you start them, like Mail and maybe Calendar. This takes a while especially if you have a massive amount of data stored.

Spotlight re-indexed after the first reboot, causing a temporary loss of Spotlight search and, full text search within Mail, for example, while the index process grinds away. Spotlight has been glitchy in the past for me, but this time "it just worked."

Lion has a monochrome palette, looking at the mostly-grey icons in Mail, Finder and Safari. Colorful icons are still present in the Launchpad and Mission Control apps. Then there are the iCal and Address Book apps which look out of character, looking like the objects they represent: iCal like a physical calendar complete with a torn paper edge and Address Book looking like an old-fashioned scheduler portfolio. They look good, but a bit out of place when compared with Mail, Finder or Safari.

Mail.app has really matured well with the Lion release, and has sharp-looking grey-on-grey icons. The problem for me is, I like to rely on color as a visual clue for speed while I work. I suppose one way of looking at it is, there are few distractions from the task at hand, and the monochromality of certain apps make it easy to concentrate on the work being done rather than on colorful icons.

Two of the key new-to-Lion features, LaunchPad and Mission Control, are very iOS-like and easy to use. For instance, to get into Mission Control, which lets you administer and move between spaces, you swipe four fingers upward on the trackpad. This is assuming you have one either on a Laptop like a MacBook Pro, or a Magic Trackpad, but I think we are in the middle of a bootstrap to make OS X very much a touch-centric OS.

An example of a really large "who moved my cheese" moment, and whopping big paradigm shift, is the scroll bars or lack thereof. Lion has the ability to allow any app that is programmed to take advantage of it, to run full screen. This looks fantastic, in apps like Mail, Safari, and even the Mars Edit edtor I am using to write this post. Further, the scroll bars do not appear by default a la iPhone and iPad (i.e., iOS), giving a very clean look to Lion apps, in general. Despite the relative hysteria over this predictable Apple shift (I mean, how many times have they done it in the past?), I am not finding it to be a problem at all. You just swipe two fingers on the trackpad to scroll, or for the trackpad-deficient, you can nudge your scroll button on your mouse. If you jiggle the trackpad with two fingers for instance, the scrollbars appear, and you can then drag-scroll as before and always.

The concept of scrolling itself has changed too, and this takes a bit of getting used to. On a tablet or phone, the touch paradigm means you push or pull the objects in the direction of the movement of your fingers, swiping and pinching. However, this is the opposite of what you might be used to, where pulling down on a scroll bar moves content up. With a touch device, this is the opposite, and so it is with OS X Lion. You pull or push the object (document, list, etc) with your fingers on the trackpad.

Safari has a neat visual indicator of download progress, to the right of the address bar.

Suspending with Option-Command-Eject is faster than ever. Where Snow Leopard was taking ages to go silent, Lion goes to sleep immediately. Perhaps this is due to all the various improvements in automatic file saving and caching?

After restarting a program, Lion remembers the exact state of it, and reopens the program how you left it. If you had 10 text files open, it will open them all back up the next time. I can see this might be annoying, but, it is really nice in many cases.

So far, I really like Lion. As I observe more, I will update this post.

Updates 24 July 2011

When you cmd-click a link in Safari, it now does the right thing and opens the tab next to what you were looking at, instead of way, way over in right field. I like it.

If you use Path Finder, note that it messes with Mission Control. I am not sure what I need to do yet, but I had to keep searching for the open Path Finder window in its Windows menu.

The upper-right hand "lozenge" icon is gone, having been replaced by the full screen icon. It was useful to quickly cycle between different views of the icon bar in any given application, if you option-click it. RIP.

The stop light icons in the upper left of any window seem to function the same, but they are smaller and daintier.

Pressing option while clicking a menu still works to bring up hidden options.

A lot of text-to-speech voices were added and are available as optional downloads. Check out the Speech preferences panel.

Updates 3 Aug 2011

Finally, a security basic has been improved, in that you can easily set your mac to lock after screen inactivity or screensaver activity. System Preferences, Security and Privacy, General.

An irritation is, Lion spell-checks everything everywhere automatically, making it a bit difficult to type, sometimes. It is the iOS paradigm for sure. You can toggle this in System Preferences, Language and Text, Text, Correct Spelling Automatically. It requires a restart.


OS X 10.7 Lion Server

Luckily, my firm was not making use of too many of the features of Snow Leopard Server, or this upgrade would have been really painful. When I upgraded to Lion Server, a lot of stuff just broke, unfortunately, but more on that below.

When you go to buy Lion Server from the App Store, you are told that both programs need to be purchased, and it is just as easy as the client to install. XCode and the Lion Server Administration tools are available as separate downloads. When you download XCode, despite the fact that it is put into /Applications, you still need fo find and run the XCode install program.

You can still use Workgroup Manager and the Server Admin app, but Lion presents the Server app as the primary admin tool. The problem with this is, the Server app is overly simplistic. Where as Server Admin had many settings, Server.app has only 1 or 2 per service, and not all services came through the upgrade unscathed.

My firm was primarily using Open Directory, Apache, Wiki, Mail, MySQL, and some development tools on our Snow Leopard server. Some problems occurred with each:

Open Directory - some user IDs broke and I had to recreate them.

Mail Server - Lion is still using postfix, but, the upgrade broke our aliases in /etc/aliases. When I told postfix how to find the aliases file, in main.cf, mail started to flow again. That being said, there is nowhere to add virtual domains and so on and so forth, like you could do with Snow Leopard Server.

Apache - the virual hosts settings do not work, and I lost a whole range of websites in this. Virtual Hosting is the most basic thing, so it was a shame that Apple could not get this one right.

Wiki - the wiki is now being served out of the postgresql database (user collab, db collab), instead of out of the Collaboration folder. Further, the looks have been generified so you no longer have the ability to customize each wiki. However, I would say the usability of the wiki went up considerably from an editor standpoint. We still cannot edit the Wiki pages using an iPad.

MySQL - is no more, though I imagine you can install it some how. Lion server comes with PostGreSQL rather than MySQL but there is no GUI for it at all. You are stuck with psql or perhaps Tuples.app.

My feeling is, Apple are aiming Lion Server at the SMB market, and shutting out businesses that really want to push the envelope on Lion Server.

If that is the case, is it not strange to have so many troubles upgrading, or to have no easy way to back up the wiki, without hiring a tech to assist.

Updates 3 Aug 2011

Setting up notifications on the wiki was difficult, because apparently the wiki recognizes only its own hostname. Perhaps I misunderstood something, but for me, entering preferred addresses for each user did not work. I had to use username@my.host.name.com and set up a .forward file in each home folder. Definitely not something for the uninitiated.


In Conclusion

I will add more as I discover. Hope this was helpful.


Saturday, March 12, 2011

Important info from US Embassy to People Stranded in Japan

The American Chamber of Commerce sent this message from the US Embassy in Japan. Please forward.

March 12, 2011  14:20

This warden message is being issued by the U.S. Embassy in Tokyo to advise U.S. citizens residing or traveling in Japan of ways to let family and friends know your status.  This information is also being posted on the Embassy website to help family members to get the status of the person they are looking for.

For information regarding tsunami warnings issued by the Japan Meteorological Agency, please see the JMA website: http://www.jma.go.jp/en or http://www.jma.go.jp/en/tsunami/

We understand that there are limited flights departing from Narita and Haneda airports in the Tokyo area. If you trying to fly out from Japan, please contact your airline to see if it is scheduled to depart.

For those who are in Japan and wish to inform of us of your condition, please send an e-mail to <JapanEmergencyUSC@state.gov>  and provide the following information:

  • Full Name
  • Date of Birth
  • Place of Birth
  • As much information as possible regarding your physical location (address, hotel name, etc.) and contact information (home phone, cell phone, email address, etc.) within Japan.
  • Please also in your e-mail please state that we may your release information to people who may contact us regarding your welfare.

We encourage you to try to contact your family and friends.  Possible ways to inform your family of your situation:

1. While we understand that there have been disruptions in communications in Japan, including the interruption of internet and mobile telephone service, we encourage you to continue your efforts to be in contact with your loved one(s) using SMS texting and other social media (e.g., FaceBook, My Space, Twitter, etc) that your loved one(s) may use.

Other possible ways to inform your family of your situation:

2.  Google

Google has created the site, "Google Person Finder".

http://japan.person-finder.appspot.com/?lang=en

If you are in Japan, you can post messages about your whereabouts.  A person looking for you can type in your name to find out if you are safe.  Similarly, your family or friends may have posted a message that they are looking for you.

3.  Cell Phone Messages

If you have a cell phone in Japan, you can post messages via your cell phone provider.  Family and friends who know your cell phone company can check the cell phone company's website below and type in your phone number to see any message you have left.  The available areas are Aomori, Miyagi, Yamagata and Fukushima prefectures.

For Docomo users:

http://dengon.docomo.ne.jp/top.cgi

For KDDI (Ezweb) users:

http://dengon.ezweb.ne.jp/

For Softbank users:

http://dengon.softbank.ne.jp/

For Wilcom users:

http://dengon.willcom-inc.com/dengon/Top.do

For Emobile users:

http://dengon.emnet.ne.jp/

Another way to find out:

http://dengon.emnet.ne.jp/

Please continue to monitor the Embassy's website, http://japan.usembassy.gov/, for updated information.

For telephone inquiries, please call 202-501-4444 or 1-888-407-4747.

US Embassy Tokyo


Tuesday, February 08, 2011

New: "Special Ops" Backpack from KILLSPENCER

Killspencer Special Ops Backpack 2011After quite a bit of back-and-forth, since my Japan-based credit card and Killspencer's card processing software were working together as well as oil and water, I finally got my Special Ops backpack the other day. Killspencer's founder Spencer Nikosey was fantastic while working through the card issues, and he soon reported that the bag had been made and was being shipped, after about two weeks' lead time.

I wanted to buy a backpack not a brief, because I cycle to the station and back, and so welcome the stability, however I did not want to look like I was going to mount an assault on Everest (Dude, don't forget your crampons, and you got the pick-axe?), and, I wanted to get one that was sufficiently business-like that I would not be embarrassed to take it to a meeting. I wanted the pack to be a little lighter than what I was using, a Crumpler Sinking Barge backpack for a laptop and a medium size DSLR, but I wanted it to be more compact, because the ol' Barge is Bulbous. Really, really bulbous. I find myself making sheepish excuses for the Crumpler's girth - say, can I move this meeting table so I can fit my bag in the room? Uh, no.

Since I just need my 15" Macbook Pro, accessories, phone, wallet, and since I mostly carry the somewhat-compact Ricoh GXR camera, I thought there must be a smaller, slimmer, more compact backpack available somewhere. So, tenacious researcher that I am (er, anal retentive?), for a couple of months I researched. I looked at a lot of bags in person and on line, including all the usual suspects like Brenthaven, Tumi, Schlesinger, Samsonite, Tom Bihn, Spire, various hand-made bags and some Japanese brands like Manhattan Passage and Porter.

I own or have owned the following:

  • Crumpler—I have the Sinking Barge DSLR-and-laptop backpack, but it really sticks out, off your back, and is fairly heavy to accommodate the DSLR padding. I like it though, basically.
  • Tumi—expensive, given that the strap grommets ripped out after less than a year of use, and a pain to get any warranty assistance.
  • Brenthaven—amazing warranty support, high quality, but the backpack for holding the MBP (granted, 17") is pretty massive, so that was a no. It weighs even more than my Crumpler. I use and like a lighter-weight Brenthaven brief, but a brief is pretty unstable on a bike.
  • Schlesinger—kind of a non-starter in Japan, especially if you have to send things back and forth to the US, what with the duty for leather being something like 50%. I had one of their leather briefs before, and liked it, but it did not give very good protection to a laptop.
  • Samsonite—went to the shop near Tokyo station, and did not really like the backpacks they had there. Love my Samsonite suitcases, though.
  • Manhattan Passage—they make a large number of bags with an insane number of pockets and variations, but the so-called "three way" models, which are briefs with hide-a-way straps, did not impress for whatever reason. I own and like one of their small shoulder bags, which is just right for a novel, a phone, a wallet, pens and so on.
  • Porter—this is a Japanese brand; they make some nice bags, but, they are expensive for what you get. I wavered between one of their backpacks and the Killspencer, but I am glad I chose the way I did. The Killspencer pack is really well made, and it makes the Porter I was looking at seem positively flimsy.

After a lot of looking, I kept going back to the KILLSPENCER line. I really like the concept of military fabric being repurposed to create bags, and there really are not that many bags that properly hold a MBP 15" but are also compact, I found.

Well: good things are worth the wait, and this item was well worth it.

Special Ops Right out of the Box

First impressions over two days of use were these:

  • It is Made in the USA. That is important to me, so long as the quality is top-class. I live here in Japan, and indeed do buy Japanese, but more and more the world seems to be about cheap goods, so you see a lot of stuff made everywhere but Japan and the US. I am happy to pay more for quality.
  • The attention to detail, right down to the embossed Civil War style logo on the wrapping paper, is exemplary. No loose threads. No weird seams. Just solid consistency and quality.
  • The black twill fabric is waxed, which lends a nice tactile and slightly-sticky feel to the bag and its optional Accessory Case. It even smells good.
  • The bag feels really solid, especially when it is loaded. It somehow stands on its own, as well, which is something I wanted but gave up on, so, a bonus. There is a handle at the top, with a removable leather handle encircling it. The handle cover has pull-the-dot snaps, and can be removed and therefore probably replaced. It feels good in the hand while carrying, even when the bag is loaded down. Generally speaking, the backpack is lighter than something similar in leather would be.
  • The Riri "Aquazip" zippers seem waterproof, and I imagine when combined with the waxy finish, will be a winning combination against Japan's rainy season.
  • The shoulder straps look a bit slim compared to the usual massive ones you see on other packs, but they are well balanced with the bag, are actually comfortable in use, and their metal buckles are well-designed, with a simple-yet-ingenious locking rocker mechanism. This bag has none of the ubiquitous nylon buckles you see so commonly.
  • The approach to space seems to be: "you decide what to do with it". It does not have a plethora of pockets. Rather, the main compartment is just a large compartment with a couple side pockets for a pen and maybe a business or credit card holder. There is an outside pocket for a wallet and so on. The laptop pocket is next to your back, and fits the 15" MBP snugly and perfectly. You can get an external "Accessory Case" pouch, suitable for an iPod or phone, or probably a pack of cigarettes if that's your vice.
  • Branding is subtle, with a good-looking black KILLSPENCER leather logo label at the bottom of the back pad, and a white-on-black fabric label on the inner side of the accessory pouch.
  • There are three horizontally-oriented "Alice Clip Attachment Point" webbing straps for attaching accessories to, along each side. Today, I found out I can stuff an umbrella down the side inside these webbing straps. It was a very simple matter to attach the accessory pouch as well; just open the sliding "Alice" connector clips, position them so they clip over the webbing strap, and then slide the locking pin into place. Nice and simple.
  • The bag comes with a wall-mount "hub" system. You screw this into your wall, and then you can hang the 'pack by its grommet, which is mounted in stiff leather right between the tops of the straps.

A Couple Small Things

There were a couple small challenges I am working through:

  • The main compartment is fairly large vertically, so you need some way of organizing the space. A folio or some kind of binder might make sense if you have a lot of business papers like I do, because there are no accordion pockets like in a briefcase. I am using a Moleskine folio and a ThinkTank Photo cable management bag to keep things from flopping around inside. Something custom from KILLSPENCER would be very nice, but the Utility Pouch is just a tad too small for papers. Something like the unfortunately-too-large-for-the-special-ops Freudian Slip from Tom Bihn, would be perfect.
  • I wonder how to take care of the black twill fabric. Can I wash it? Do I need to NikWax it?
  • It would be nice if there were a key ring inside the 'pack, to clip the fancy keychain accessory to. Not much I can do about that but maybe in a future version...


I do get the irony of a decidedly non-military desk-jockey like me being attracted to this bag, steeped as it is in military terminology and history. But in the end, what I like about the KILLSPENCER approach is, the respect he has for both the modern "road warriors" who might buy this bag, and the real warriors in our military.

Well, that is about it. I am really impressed with the bag, and like it a lot! Please see the photoset here.

Hope this review helps someone.


Killspencer embossed paper wrapperKillspencer Special Ops Backpack 2011Killspencer Special Ops Backpack 2011Killspencer Special Ops Backpack 2011Killspencer Special Ops Backpack 2011Killspencer Special Ops Backpack 2011Killspencer Special Ops Backpack 2011Killspencer Special Ops Backpack 2011Killspencer Special Ops Backpack 2011Killspencer Special Ops Backpack 2011Killspencer Special Ops Backpack 2011Killspencer Special Ops Backpack 2011Killspencer Special Ops Backpack 2011Killspencer Special Ops Backpack 2011Killspencer Special Ops Backpack 2011Killspencer Special Ops Backpack 2011Killspencer Special Ops Backpack 2011

Friday, January 21, 2011

Geek Out: Scheduled Indexing of your Concrete5 via Cron

I thought I would share how to get the automatic indexing working in a Concrete5 site, if you happen to use that CMS.

There is a special URL in the admin dashboard, which you can call from cron, to periodically re-index your site.

How to get Concrete5 to Automatically Index in One Easy Step

This is what the cron entry should look like:

27 * * * * /usr/bin/wget -O - -q -t 1 http://www.myc5domain.com/index.php/tools/required/jobs?auth=19eef....etc

This runs the job every hour at 27 minutes past. You should also be able to use other programs to hit the URL if wget is not installed:

27 * * * * /path/to/lynx -source http://www.myc5domain.com/index.php/tools/required/jobs?auth=19eef....etc
27 * * * * /path/to/curl --silent --compressed http://www.myc5domain.com/index.php/tools/required/jobs?auth=19eef....etc

Make sure you use absolute paths with cron because its environment is not the same as that of a shell. It is more limited. Also, of course the way you enter cron jobs will be different per host, and some may allow you to do it via a control panel. Either way, if you do not know how, you can ask your hosting company. This is a typical and easy thing to set up, if you provide them with your Concrete5 installation's special index URLs from the dashboard.

Enjoy!

Saturday, January 08, 2011

Happy, SuperDuper! Happy.

SuperDuper! Saves the BaconMy hard-working Macbook Pro, which I keep running pretty much 24x7 without a break, had a hard disk failure yesterday. The dead disk was inconsolable, and no amount of Disk Utility or fsck or Applejack would cure its ills. I tried the usual boot-from-install-dvd-and-run-disk-utility, but that did not work either, and the fact that I do a daily Cocktail run to keep things clean wasn't relevant - a dead disk is a dead disk. Then I remembered I had been taking a nightly scheduled backup with Shirt Pocket's super-duper utility "SuperDuper!", and so a little manual reading later, I was able to get back up and running in a jiffy.

Here's How I Restored a SuperDuper! Backup to a New Hard Disk

First I went and got a 500GB Seagate Momentus XT hybrid hard disk / SSD drive. Pretty nifty technology. It was trivial in my 1st generation MacBook Pro unibody to remove the old disk and put the new one in. You just remove the battery, and there is a single plus screw holding in the bracket that holds the drive in. However, you do need a Torx driver to remove four small posts from the drive itself, so you can transfer then to the new drive. A Torx T6 size is what fits the model I have.

Once the drive was installed, next, I booted from my Snow Leopard DVD, and after a while I saw the familiar install screen prompting for a language choice. You will notice that a menu will appear at the top of the screen, and that you can then choose to open Disk Utility from that.

In Disk Utility booted from the DVD, I then got busy partitioning the new drive (just chose to make one big 500GB partition called "Macintosh HD" as usual), and then went to the Restore tab. It is not a problem to restore a sparseimage made from a 300GB drive, to a new 500GB drive, so I just connected the FireWire drive containing the SuperDuper! sparseimage file, and did a File, Open in Disk Utility to mount that image. I chose the backup from within the sparseimage, and told Restore to restore to Macintosh HD. About 2.5 hours later, the restore completed without incident.

I then used Disk Utility, still in setup mode, to verify the drive and repair permissions. No problems detected.

Post-Restore Tasks

There were a couple of things to do after the restore.

  • SuperDuper! restores the drive just fine, but renamed it to the name of the sparseimage. I had to do a cmd-i on the drive in Finder, and rename it back to Macintosh HD.
  • Since SuperDuper! excludes the sparseimage from indexing, your restored drive will also be excluded. Just go into Spotlight preferences, and remove the Macintosh HD from the Privacy exclusion list.

So, in conclusion, that nightly backup via SuperDuper! to an external FireWire drive really saved my bacon! Kudos and thanks, Shirt Pocket!

Monday, November 01, 2010

Ricoh Japan - New GXR Firmware v1.29 - Fast AF WOW!

Ricoh Ginza HQ Chat Area

Ricoh Japan just released the new GXR firmware, version 1.29, on their Japan site, and the autofocus speed is now really, really fast. Everyone who has a Ricoh GXR with A12 50mm module should definitely update right away. Fantastic improvement and thanks Ricoh!

How to Upgrade Ricoh GXR Firmware

  1. Download the firmware and unzip it.
  2. Put the firmware files (several files) onto an SD card and put the card into the camera.
  3. Make sure the camera is off.
  4. Press plus and playback buttons simultaneously for a few seconds until you see the LCD change.
  5. Follow the prompts, OK-ing to install.
  6. Don't mess with the camera while it is updating.

That's it.

Tuesday, September 28, 2010

Switching Parts of a String in Excel

I had the need to fix mistakenly entered email addresses in Excel, and luckily the mistake was a recognizable pattern. They should have been firstname.lastname@domain.com but were entered as lastname.firstname@domain.com. This short post explains how I extracted the names and switched them.

How to Swap Parts of an Excel String

First assume you have smith.joe@acme.com in cell A2, and that what you want is joe.smith@acme.com in cell A5. Enter this formula in cell A3:

=LEFT(A2,(FIND(".",A2,1)-1))

That extracts "smith" out of the email address in A2, by using the FIND function to return the number of the position of the period. You subtract 1 to tell LEFT when to stop extracting.

Next, in cell A4, enter this formula:

=MID(A2,(FIND(".",A2,1)+1),((FIND("@",A2,1))-(FIND(".",A2,1)+1)))

That uses MID to extract from one after the period, through one behind the @. This is about finding the positions of parts of the string you can see are in a pattern, and subtracting or adding 1.

Now in A5 you can concatenate the two in the proper order, and add the domain, thusly:

=A4&"."&A3&"@acme.com"

That's it & good luck!

Sunday, September 05, 2010

Mama-chari Schrader Valve "Mushi Gomu" Repair

Shinko "Mushi Gomu" Valve RubberIf you live in Japan or have visited, you will know the ubiquitous "mama chari" (mom bike) from its loud squeaky brakes, and precarious perching of bags and children both, on its front and rear platforms and baskets. My wife's mama-chari rear tire got a flat, and as the resident mechanic around the house, I got to fix it. I tried pumping it up, but that was not working, and noticed that to get the rear wheel off if I had to remove the tube, I would have to disassemble the rear friction brake (the source of all that squealing!).

Yikes, lots of parts. I decided to google removing the rear wheel on a mama-chari, and found an article talking about that topic, but warning readers to make sure the "mushi gomu" was intact, saying this is a common cause for what people think are flats. This mysterious "bug rubber" (虫ゴム) is just a little rubber tube about 1.5 mm diameter and 2 cm long, that you slide over the valve plug. It forms a seal between the metal valve plug and the side of the valve, letting air in during the pumping, but keeping it from flowing out otherwise. But, it makes like a flat if it is oxidized.

If you remove the valve cap, and unscrew / pull out the valve plug from the valve case sticking out of the hole in the rim, you can check whether the rubber is rotted or otherwise broken. Sure enough, when I took a look at ours, it was all rotted and falling off. So I went to my LBS (Local Bike Shop) and asked for "mushi gomu". JPY 150 and we were all fixed in 5 minutes.

Hope this helps other cycling DIYers in Japan.

Tuesday, June 22, 2010

Convert Line Endings with Aplomb

When transferring files from system to system, for instance, using csv files to transfer data from one db to another, sometimes there are problems where programs will not process a file because of its line endings. This happens especially if you process a file on one platform, say Mac, and try to use the file on another, say Windows. Even if you have saved a file as CSV from Mac Excel 2008, it will not necessarily be saved in a format that can be read programmatically, if the program is expecting a certain type of line ending.

How Can We Avoid Line Terminator Problems and Troubles?

Let's recall how lines are terminated by default on Windows, Mac and Unix.

  • Windows-style line endings are CRLF ( \r\n or hex 0D0A )
  • Mac-style line endings are CR ( \r or hex 0D )
  • Unix-style line endings are LF ( \n or hex 0A )

There are a number of ready-made command line programs like unix2dos, dos2unix, mac2dos, dos2mac and so on, that can be used to convert line endings. Note that you can also use the tr or perl commands as well. Tr is available on Macs by default and on almost any unix. Perl is pretty ubiquitous as well. E.g:

[root@server /path/to/files]# tr '\r' '\r\n' win-crlf-file.csv

[root@server /path/to/files]# tr '\n' '\r\n' win-crlf-file.csv

[root@server /path/to/files]# perl -pe 's/\r\n|\n|\r/\r\n/g' unix-lf-file.csv > win-crlf-file.csv

If you want to find out whether a file has the expected line terminators, you can use the file command on *nix or Mac. Here's what that looks like:

[root@server /path/to/files]# file inputfile1.csv

inputfile1.csv: ASCII text, with CRLF line terminators

[root@server /path/to/files]# file inputfile2.csv

inputfile2.csv: ASCII text, with CR line terminators

You can also use the cat command to show line endings, with its -e switch. Do a man cat for more info, because you can also get line numbers, for instance. The first file below has CRLF, which shows up in cat’s output as ^M$, and the second file has only a ^, which is equivalent to the Mac CR line ending only situation. What you need will depend upon the import program.

[root@server /path/to/files]# cat -e inputfile1.csv

Part,Cust,Price,StartDate,EndDate,Reason^M$

123-ABC-456,CUST000001,100,6-01-2010,05-31-2011,Regular Update^M$

456-ABC-789,CUST000001,100,6-01-2010,05-31-2011,Regular Update^M$

[root@server /path/to/files]# cat -e inputfile2.csv

Part,Cust,Price,StartDate,EndDate,Reason^123-ABC-456,CUST000001,100,01-06-2010,31-05-2011,Regular Update^

Besides line endings, there is also the text encoding of the file, to watch out for. For instance, is the file saved in Roman or Unicode or some other format? In the end, take care to confirm the file you have output is what is needed by the program for input. Enjoy!

Tuesday, June 01, 2010

Fixing a Mac OS X Spotlight Index, that Doesn't

Mail.app "Entire Message" Greyed OutAfter a spate of Mail.app problems probably related to having too damn many mail accounts and messages, I had to do the "Mail.app Reimport Samba" taking hours to let Mail.app reimport the entire mail store. After that got resolved, I found out that my Mail.app "Entire Message" selection in Search was greyed out. This turned out to be a symptom of a problem with the Spotlight index, since this search function of Mail.app is dependent upon the Spotlight index of the hard drive where your mail is stored. Generally speaking, the Solution was to delete the Spotlight index, and then re-index the drive. However, it was not a simple process (is anything?!), and as such was very "un-Apple", so I thought I would take the time to document it.

How to Make Spotlight Re-index Your Drive, Even When She Says No!

A.k.a., How to Fix Greyed Out "Entire Message" in Mail.app Search. As I was learning to do this procedure in my OS X 10.6.3 system, looking at the Apple forums and elsewhere, I observed that Spotlight was taking "forever" to re-index, while it should re-index a 500GB drive in an hour or so. When I clicked the "pulsating" Spotlight icon in the upper right of the screen (it pulsates or winks while re-indexing), I saw a message that Spotlight was calculating the time required to index the drive with a barber pole progress bar, but it was just stuck in this state for days. This prompted me to try various things to fix it, and no one method from any one forum ever worked for me, in practice.

So, let me try to explain what did work.

Remove the Extraneous

Disconnect any external drives and shut down any unneeded programs.

Remove Unneeded Spotlight Importers

Spotlight importers which allow programs to get their output files indexed are sometimes the cause of Spotlight crashes. You can find them in /Library/Spotlight and ~/Library/Spotlight (where ~ is your home directory, of course). If you have third-party importers, especially in ~/Library/Spotlight, you can move them to another folder for safekeeping, then move them back one by one to see if the "indexing forever" problem recurs. I deleted ones that were associated with programs I never use, but kept the ones I do use.

You can search the entire drive for the .mdimporter files, using this command. Hat tip to "Hal Itosis" (lol) on the MacFixit Forum.

# find -x / -iname \*.mdimporter -exec ls -lndotT {} +

Repair Disk Permissions

I use the excellent Cocktail for this but you can do it in 3rd Party OnyX or Apple's included Disk Utility as well. In Cocktail, use the Disks menu, Permissions tab. Choose to Reset Permissions and ACLs for Home Directories for All Users, then click Repair. This takes about 30 mins to execute.

Prepare the Index

Using Terminal, use launchctl to unload the indexer by controlling the appropriate launchd command, use mdutil to turn off indexing for the root folder (the /) of the local hard drive, use rm to delete the index itself (.Spotlight-V100 in the root of the drive), and finally trash Spotlight's plist.

$ sudo bash

Password: *******

# launchctl unload -w /System/Library/LaunchDaemons/com.apple.metadata.mds.plist

# mdutil -i off -E /

# cd /

# rm -rf .Spotlight-V100

# rm -rf ~/Library/Preferences/com.apple.spotlight.plist

# exit

$

To explain, note the sudo bash and exit lines, bookending the procedure. This gets you a root prompt (the #) after you enter the admin password and then exits the root prompt at the end (returning to the $ prompt). You can also use sudo before every command, to be extra safe.

Clear All Caches

Noting that this part will force a reboot, again in Cocktail Files, Caches, choose Options and select all caches you can. Executing this resets the system to a state close to what you get when you install anew or do a major upgrade. Note that the system will take longer to restart because it is rebuilding caches, and applications will be sluggish the first time they restart, because they are rebuilding font caches.

Click Clear to execute the cleaning procedure and wait while it finishes. Choose to let the system restart, but when you hear the startup chime, hold down Shift so the system restarts in Safe Mode.

Safe Mode Index Rebuild

The system will take a while to get into Safe Mode. After you press and hold Shift while starting up, once you see the progress bar during startup (which is not present in normal mode), you can let go of Shift and go get coffee while it starts up. The login prompt will have a red Safe Mode in it, to alert you to the difference.

Again in Terminal, issue some commands to rebuild.

$ sudo bash

Password: *******

# launchctl load -w /System/Library/LaunchDaemons/com.apple.metadata.mds.plist

# mdutil -i on -E /

/:

Indexing enabled.

# exit

$

After a few minutes you should see the Spotlight icon start to pulsate, but this time, the "Calculating Indexing Time" should change to some value, and a blue progress bar, which means the indexing is actually working. You can restart into regular mode, and the indexing just picked up where it left off, for me. However, do not connect any additional drives until it is done indexing the main drive.

Observing and Confirming

There are a few things you can do to observe and confirm Spotlight's activities, in Terminal. This assumes you are at a root prompt.

Check the size of the Spotlight index using du (directory usage):

# du -hsc /.Spot*

1.1G /.Spotlight-V100

1.1G total

Note that this should be a fairly large file. If it is only a megabyte or so, something is broken or your Spotlight index is off.

Check Spotlight-related processes with ps (process lister):

# ps axcru |sed '1p;/ md/!d'

USER PID %CPU %MEM VSZ RSS TT STAT STARTED TIME COMMAND

root 352 0.0 2.8 3696728 117196 ?? Ss 8:44AM 24:25.73 mds

_spotlight 6677 0.0 0.2 2532748 10292 ?? SNs 3:19AM 0:00.33 mdworker

rcogley 6664 0.0 1.2 2638620 48240 ?? SNs 3:19AM 0:02.95 mdworker

Check index status with mdutil.

# mdutil -as

/:

Indexing enabled.

/Volumes/COGLEY-WD:

Indexing enabled.

/Volumes/COGLEY-WD/Backups.backupdb:

Indexing enabled.

/Volumes/COGLEY-WD2:

Indexing enabled.

/Volumes/COGLEY:

Indexing enabled.

List open files in /System/Library related to Spotlight, using lsof (list open files).

# lsof -c md |grep -v /System/Library |grep -v Spotlight

Get general system information with df and diskutil:

# df -lh

# diskutil info /

Show commands you have entered in the bash shell:

# history

Note that if you use an alternative shell like fish, some of the above commands will not work. From fish, just do sudo bash to get a bash-based root prompt. Be sure also to check the Console GUI application in /Applications/Utilities. This will show crash information for the mdworker program, which may give you hints to what is going on.

I hope this article helps someone, especially since this problem seems to be pretty prevalent, these days. Enjoy!

Friday, May 21, 2010

Apology accepted, Zendesk. Thank you.

Zendesk CEO Sorry TweetIn the wake of the Zendesk Price Fiasco of 19 May 2010, in which SaaS helpdesk vendor Zendesk announced pricing hikes which negatively affected most of their users (and would have caused a doubling for us), and after which an angry firestorm erupted, Zendesk users received an email apology from CEO Mikkel Svane today, and more information in his blog post.

I have a bit of a bitter taste in my mouth after having been treated that way, but let's let bygones be bygones. I very much appreciate the real grandfathering they have extended to existing customers.

So, apology accepted, Zendesk, and kudos to you Mikkel for doing the right thing. I am sure it was difficult.

Thursday, May 20, 2010

SaaS Helpdesk Software that Supports Japanese

After the Zendesk Price Fiasco of 19 May 2010, where Zendesk are proposing to significantly raise prices for their SaaS helpdesk solution, I am confident many users are looking elsewhere. This is one of the pitfalls of a SaaS solution, wherein the provider achieves external investment, and subsequently bows to pressure from said investors to raise prices or otherwise change a model that was working. At least for we users.

In our case, the cost of Zendesk, while was higher than others, was justified because it somewhat supported the Japanese mails my firm gets. I say somewhat because certain mails would cause Zendesk to have a fit, but that is mostly calmed down now.

That being said, now that Zendesk has basically doubled their prices for us and while I have made no decisions on whether to accept their "offer" of prepaying annually to lock in the current pricing for one year, I thought I would list alternatives and whether they support Japanese.

It is important to note, that there are several aspects to "supporting Japanese" some of which include:

  • User Interface
  • Ability to Email in and out of the Helpdesk
  • Ability to search
  • Ability to store Japanese data

Many web based products, and not just Helpdesk products, face these challenges when localizing to multi-byte character sets. User Interface is straightforward, as is the ability to store the data. These are kind of "level 1" localizations. Searching is harder, because of the space-less nature of Japanese, and emailing in and out is a major pain. Often, they get the email body correct, and you can see Japanese in it, but, the subject line is munged. It is a complex undertaking, especially for non-native speakers. So, caveat emptor.

List of Helpdesk Software that Supports Japanese

Confirmed Positive:

Zendesk themselves. Most Japanese mail is processed correctly but there are some glitches occasionally. We have personally confirmed all the above-mentioned aspects of Zendesk.

Kayako's Savin Behal replied to me in an email: Our software supports multiple languages. You may download the required (Japanese) language packs from the Kayako Forums at “http://forums.kayako.com/f50/”. These language packs have been shared by our clients. However, we regret to inform you that we do not support these packs officially.

Active Campaign supports Japanese fully, according to Jason in the comments on this post.

Web Helpdesk says they do indeed support Japanese email. From Shiraz Hemani, Business Development Manager: "Per your questions on email, yes Web Help Desk fully supports monitoring of any number of incoming mail accounts in all language character sets, including Japanese. Each incoming account can be associated with any number of outgoing mail accounts as well. We have more info available for that feature at:

http://www.webhelpdesk.com/trouble-ticket-software/convert-email-to-ticket.html"

Atlassian Jira does support Japanese. We had been using it in Japan, but moved away from it due to the glacial pace of development of certain security-related enterprise features we needed.

Confirmed Negative:

Tender says they do not support Japanese. Will says: "... I'm sorry, but we don't currently have international language support in Tender. We do hope to add the feature in the near future, but it's not ready at this time."

Unconfirmed:

http://www.cerberusweb.com/

http://www.thevisionworld.com/

http://www.autotask.com/software/service_desk.htm

Please comment if you have more or better information.

Updates

21 May 2010 - Zendesk has since recanted, apologized, and offered real grandfathered terms for existing customers. I have to say I have a bitter taste in my mouth, but, I would be remiss if I did not acknowledge the difficulty of changing systems. We'll sit a spell.

Wednesday, May 19, 2010

How not to run a SaaS: Zendesk

Zendesk CEO Noise CommentI got an email from Zendesk in the middle of the night and this blog post, breathlessly announcing "new features!" and along with that, new pricing. I and many other users could probably have dealt with an x% increase, but a doubling? It was even worse for people on other plans, as well, and that means a lot of upset users. CEO Mikkel Svane's patronizing attitude is not helping matters either (see the screen shot of his arrogant tweet in this post).

Down to brass tacks: we have 8 agents on the Plus+ plan and are paying the equivalent of 27 USD / agent per month. The new announced pricing puts it at 59 USD / agent per month. Users are being given an "opportunity" to lock their existing pricing in, by paying annually for a 15% discount, and it appears that the limit to this is one year. So, we take the hit up front by paying up front, and we take another hit later anyway. Sounds like a plan, Zendesk.

This is a one-sided, sneaky and very much not transparent decision on pricing by Zendesk, which I suspect is being driven by chop-licking investors. Who can trust Zendesk now that they have shown how they will treat customers. If we take the offer being dangled, who knows what will happen after their next round of investment.

Unacceptable way to run any business, and a slap in the face. I hope Zendesk will respond in a positive way, instead of burying their collective head under the sand.

Updates

20 May 2010 - no proper response from Zendesk as of this AM. Zendesk users still angrily commenting (of course). 21 May 2010 - an email in from Mikkel Svane, Zendesk CEO, recanted and apologized for the mistake, as well as grandfathering existing customer prices in forever. That was nice of him, and appreciated.