Tuesday, January 29, 2008

Tip - OS X Leopard Screen Sharing Tweaks

The default Leopard screen sharing app can be made a little more ARD-like, if you add some parameters via the "defaults write" command in Terminal. Check out the default style by sharing the screen of a neighboring computer in Finder. You can enable Screen Sharing on a machine in System Preferences, Sharing.
Now, to add the extra settings, first, open Terminal from your Applications, Utilities folder, then issue the following three commands (each is a single line):

defaults write com.apple.ScreenSharing ShowBonjourBrowser_Debug 1

defaults write com.apple.ScreenSharing 'NSToolbar Configuration ControlToolbar' -dict-add 'TB Item Identifiers' '(Scale,Control,Share,Curtain,Capture,FullScreen,GetClipboard,SendClipboard,Quality)'

defaults write com.apple.ScreenSharing 'TB Is Shown' 1

You will now be able to open Screen Sharing and see local computers on your network that can be controlled, and, there are some additional buttons to use related to scaling, curtaining (display blackout), clipboard, quality (set to low quality for faster response) and screen capture.

Monday, January 21, 2008

Tutorial - Making Nice with Mail.app Rules

Tutorial Introduction

I got Mail.app set up to use Gmail's IMAP, and wrote a bit about it in this tutorial. One of the next steps I wanted to take, was to somehow manage all the mail that comes in from subscriptions, or, regular announcements from colleagues regarding common reporting milestones. In Microsoft Entourage, I was using an AppleScript and Rules, so I reckoned I could use a similar approach in Mail.app.

This tutorial describes how I solve the challenge, marking my subscriptions and regular mails as "Expiring", so that I can use a smart folder to view and prune them regularly.

Prerequisites

Here's what you need to follow this tutorial:
  1. Leopard Mail.app
  2. Andreas Amann's Mail Scripts
  3. John Maisey's YAI You Are Invited
  4. Scott Morrison's Mail Act On

Let's get started.

Understanding Some Initial Failures

At first, I went down the path of attempting to use Scott Morrison's MailTags beta for Leopard to try to tag incoming mails with a keyword and project, but in the end, I was forced to give up using this excellent Mail.app bundle. It seems that Google Mail's IMAP implementation is simply non-standard, and it does not play well with what MailTags needs to do, which as I understand it is to write tag information into custom mail headers. So if you use Gmail and IMAP, you're out of luck to be able to use MailTags at this point.

Secondly, I was thinking to use my technique from Entourage, which was to use an AppleScript fired by a rule for all incoming mail, to check a list of recipients. This was not very easy to use though, because I was forever opening up the script to add new addresses. Not very elegant.

In the end, what worked was to check to see whether a sender was in an Address Book group called Expiring, then check for this membership in a rule, moving the message into the Expiring folder.

Mail.app Rules Intro

You access rules in Mail.app preferences. Cmd-, while in Mail will bring it up, as in all Mac apps. The rule tab after being populated with some rules looks like this.

Mail.app Rules Expiring

There are a few points to note about Mail.app rules:

  • Rules are processed from top to bottom.
  • Mail.app will stop processing a rule either when it encounters a rule with the "stop evaluating rules" Action enabled, or, when a rule moves a mail to another mailbox.
  • There is no complex nested boolean logic to use within rules, so you need to make a few of them to cover your cases. You are limited to checking if All criteria or Any criteria are true, which translates to an AND or an OR on the criteria you enter. You cannot make a statement like, if 1 AND 2 are true, OR 3 is true, then do the following actions.
  • You can apply the criteria of when a message is "From a given Address Book group" but you cannot check when a message is "To a given Address Book group".
  • It is best to be specific when creating rules, especially with regard to exact senders and recipients. Leaving To undefined, for example, may cause some unexpected problems.

Creating a Rule - If Sender in Expiring Group AND Message is To Me

In the Rules preference panel, click Add Rule to add, then fill it out. This rule checks to see if a sender is in the "Expiring" group in Address Book, AND if the message is addressed To me are true (using the If All selection), then move the message to the Expiring folder, and set its color to purple.

Mail.app Rules Expiring to Cogley

Because the rule moves the message to another folder, Mail.app stops evaluating further rules. You can create one of these rules for each of your main mail addresses, that is, move any mails From members of Expiring group to me@corporate, or me@gmail.

Note - there is a bug in Leopard 10.5.1 Mail.app, which does not allow you to set color first before moving and therefore stopping the evaluation of the rule. I tried to enter the actions in the correct order for doing this, but, Mail.app rearranges the rules, putting the color change second, and therefore, it does not apply color consistently.

Easily Add Senders to Expiring

To make adding senders to an "Expiring" (or any other) group easy, use "Add Addresses" from Andreas Amann's excellent Mail Scripts. Prepare to use it by adding the group first, in Address Book. Then, when a mail comes in From: newletter-sender@someco.com, To: me@corporate (for example), you can select the message, and then choose "Add Addresses" from the Mail Scripts folder in your Scripts folder. Select the addresses to add, and choose the group and label, as appropriate, which you have created in Address Book beforehand.

Mailscripts Add Addresses

Senders who are in Address Book group Expiring will trigger the rule, and it will move the message to the specified folder.

Other Cases - Mail is From and To the Same Sender

Many times, newsletters are sent To: and From: the same address. In this case, your above rule will not work, and you have to create specific rules for each case. To make this easy, use "Create Rule" from Mail Scripts.

In your mailbox, select a newsletter with To: and From: that do not fit your catch-all rule, then choose Create Rule in your Mail Scripts folder in your Scripts folder. Create Rule has intelligence built in, and will detect the addresses on the mail, and add them to the dialog for you to easily select.

Create To-From Rule with Mail Scripts

You can apply the new rule by ctrl-clicking the mail, and choosing Apply Rules from the context menu.

Apply Rules in Context Menu

In my case, I have a number of mails like this that once they are read, I know I will not refer to them again. I repeated this rule create step for each one, and it is quick enough to do when one comes in that you forgot about.

You're Invited and OmniFocus

John Maisey's YAI is an AppleScript written to deal with the problem of Mail.app not being able to process the TimeZone information that is embedded in Microsoft Outlook / Exchange calendar invites. You can open the invites in a text editor, and replace the offending line with a correct one, but, it is so much easier to get YAI to do it for you. The YAI installer creates a rule, that sits on top of your rule stack, and fires for every mail. It looks like this:

Mail.app You Are Invited YAI

Basically, it says for every message, run the AppleScript at such-and-such path. Another example of such a rule is the rule that can be installed with OmniGroup's superb OmniFocus which is an app that helps you implement GTD, or Getting Things Done. Here, you can see that if Mail.app detects the OmniFocus "secret code" of a subject line starting with two dashes, then it will run the AppleScript to put the mail into OmniFocus where you can act upon it.

Mail.app Rules Send to OmniFocus

Mail Act On

Another application that uses rules is Scott Morrison's Mail Act On. While MailTags did not work in my environment (Gmail), Mail Act On does, and gives a popup bezel to apply a particular rule to a selected message or messages. I use this to move certain mails in Expiring to another folder called Reference. To use Mail Act On after installing it, you press a key sequence to bring up the bezel (mine is set to Shift-Cmd-`) and then hit the key to apply the rule. So, Shift-Cmd-` then r means "move to reference" for me. See if you can make it work, and note that Mail Act On rules appear at the bottom of your rules list, after an initial one that has a "stop evaluating" action.

Wrapup

In this tutorial, you read some basic pointers about Mail.app's Rules processing, and can process messages that will "expire" in an effective manner, so that you can later prune or archive them. The cast of characters in this play are Andreas Amann's Mail Scripts, John Maisey's YAI You Are Invited, and Scott Morrison's Mail Act On as well as Apple's Mail.app.

Decision Summary

During this setup, we made the following decisions:

  • To forgo MailTags, but use Mail Act On to allow us to apply rules selectively.
  • To reference in Mail.app Rules an Address Book group called "Expiring", the members of which are senders of newsletters and such like.
  • To use Mail Scripts to assist in making Mail.app operations easier.
  • To use YAI to automate changing the timezone of Outlook calendar invites.

Good luck, and if you find better ways of doing things in a similar environment, please do not hesitate to comment.

Thursday, January 17, 2008

Tutorial - Make a "Reference Times" Lister

In my job as a consultant, I often need to schedule meetings across timezones, and sometimes do not want to struggle with cross-platform incompatibilities between calendar software. There is some excellent software out there for this purpose, namely 1stClock on the Windows platform, or Vela Terra on Mac, but I thought I would roll my own quick solution with Automator channeling some shell script.

Here's how.

Create the Workflow in Automator

First, start Automator, and save the Automator workflow as "Timezone List to Clipboard" or something similar. Add a "Run Shellscript" action, and a "Copy to Clipboard" action under that.

Next set the Shell to "/bin/bash", and paste the following code into the text box:

echo == Reference Times ==

echo -e "Tokyo - \t" `TZ=Asia/Tokyo date "+%Z (%z) %R %a %e %b %Y";`

echo -e "Hong Kong - \t" `TZ=Hongkong date "+%Z (%z) %R %a %e %b %Y";`

echo -e "Calcutta - \t" `TZ=Asia/Calcutta date "+%Z (%z) %R %a %e %b %Y";`

echo -e "Berlin - \t" `TZ=Europe/Berlin date "+%Z (%z) %R %a %e %b %Y";`

echo -e "London - \t" `TZ=GMT date "+%Z (%z) %R %a %e %b %Y";`

echo -e "New York - \t" `TZ=US/Eastern date "+%Z (%z) %R %a %e %b %Y";`

echo -e "Chicago - \t" `TZ=US/Central date "+%Z (%z) %R %a %e %b %Y";`

echo -e "Denver - \t" `TZ=US/Mountain date "+%Z (%z) %R %a %e %b %Y";`

echo -e "San Francisco - \t" `TZ=US/Pacific date "+%Z (%z) %R %a %e %b %Y"`

These lines echo an appropriate text string, execute the date command feeding the same the TZ= modifier, which makes the date command return the current date and time in the specified timezone. The percent this and that at the end are the date format.

Save As an Application

Save As the file to File Format "Application", and drag your .app file to your Dock. Now when you click it, you have a quick way to get text like this into an email for better collaboration.

== Reference Times ==Tokyo -

JST (+0900) 22:39 Thu 17 Jan 2008Hong Kong -

HKT (+0800) 21:39 Thu 17 Jan 2008Calcutta -

IST (+0530) 19:09 Thu 17 Jan 2008Berlin -

CET (+0100) 14:39 Thu 17 Jan 2008London -

GMT (+0000) 13:39 Thu 17 Jan 2008New York -

EST (-0500) 08:39 Thu 17 Jan 2008Chicago -

CST (-0500) 07:39 Thu 17 Jan 2008Denver -

MST (-0700) 06:39 Thu 17 Jan 2008San Francisco -

PST (-0800) 05:39 Thu 17 Jan 2008

Hope this helps someone. Have fun consulting across timezones!

Tip - Making Mail.app Messages Readable

I have a Macbook Pro, and I noticed upon upgrading to OS X Leopard, that the default message size for Mail.app messages was too small to read. Sure, you can add a button to your toolbar to increase font size on a per-message basis, but this gets old after the 1000th time. Some Terminal magic will fix the problem:

To increase the minimum font size for HTML messages, do the following:

  1. Open Terminal.app. Spotlight search on "Terminal", press Enter on the app.
  2. Type the following at the Terminal prompt and press Enter:

defaults write com.apple.mail MinimumHTMLFontSize 13

Now after a restart your HTML messages will have a base font size of 13 points, which is much easier to read, and you can set the font size to a point size you are comfortable with.

Tutorial - Setting up Leopard Mail.app with Google Gmail IMAP - The Basics

Tutorial Introduction

I switched from Windows to Mac OS X Tiger on a MacBook Pro about two years ago in early 2006, and have been enjoying the experience immensely; even more so with Leopard. I purchased Entourage with Office 2004 for Mac and had been using it with my corporate Exchange server at my company eSolia, but had grown weary of the monolithic local message store, so in December 2007, I decided to give Mail.app, iCal and Address Book a go on Leopard. Looking back, it's funny that I was so diehard Windows-only.

This tutorial describes how I set up Mail.app in OS X Leopard to handle both private and work email, using Google Mail accessed via the IMAP protocol, and sending mail via my ISP's SMTP server to avoid the Outlook "sent on behalf of" problem.

I'll make these naming conventions for this tutorial:

  • Your "private" email is your Google Mail account
  • Your "corporate" email is your account on a domain you or your company owns

Prerequisites

Here's what you need to prep before you begin:

  1. Google Mail Account information
  2. Information for a forward-able "Corporate" Mail Account
  3. ISP login and SMTP information

Let's get started.

Setup Forwarding for your Corporate Email

Setup your corporate email address to forward to your Google Mail address. In my case, I did this in Active Directory on my Exchange server, so that anything that comes in to my corporate address gets forwarded to Google Mail and does not get saved on Exchange. Other systems have other methods, like the use of hidden .forward files in the ~ home folder on a *nix server, and this is going to be slightly different for each person. The thing to watch out for is whether forwarding will take place server-side, or, you have to be logged in with your mail agent started for the forwarding to happen. Using Outlook's client-side rules is an example of the latter.

Setup an Account in Mail.app for Gmail

Setup an Account in Mail.app. You do this in Mail.app Preferences, Accounts, clicking the + sign as per usual in (usually) nice, consistent Apple applications. When the wizard starts, you'll have a choice to go for an automatic setup, but don't select that option. Go for the manual setup.

There are plenty of sites, Google's included, that explain how to set up Mail.app for basic IMAP access, so I won't bore you too much. In the Account Information tab, you can have both your corporate and private addresses. Note I have rick dot cogley @ esolia ... followed by a comma, followed by my private Gmail address, in "Email Address." The incoming mail server should be imap.gmail.com, and the username is your Gmail account without the @gmail.com.
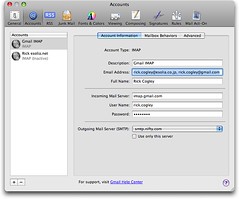
Avoid the Outlook "On Behalf Of" Problem - Use your ISP's SMTP

For the outgoing SMTP server, I used my ISP @Nifty's provided one. Drop down the server list, and choose Edit server list. Then add your SMTP server's information. @Nifty requires us to log in (smtp-auth) to use their SMTP servers, and they require port 587 (as opposed to the more generic port 25). Set this up as specified by your provider. You might use your company's SMTP server as well if it is convenient and accessible from both inside your company network and outside.

Why not use Google's smtp.gmail.com? After all, if you do, everything you send out via it gets put into your sent items, which is convenient. The reason is an esoteric one, which has to do with the way Outlook or Exchange treat mail headers. If you send via smtp.gmail.com to an Outlook / Exchange user, they will see "From rick@gmail on behalf of rick@corporate" which is not very professional, is it.

Setup Advanced Settings

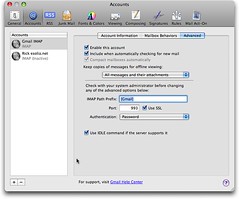
In the Advanced tab, enable the account, include it in checks for mail, decide how much of a mail and its attachments you want to keep for offline viewing. Set the IMAP path prefix to "[Gmail]" (without the quotes, of course) if you want a cleaner look for your folders in the main Mail.app interface. However, a warning: changing this means that Mail.app will RESYNC your entire mail store with Gmail. If you have a lot of mail stored in Gmail already, this could take a serious amount of time. I have about 1.5 GB, and it took days to sync.
Setup Mailbox Behaviors

Next use the Account's Mailbox Behavior's tab to set up what Gmail folder goes where, and what sync's with what. Here's how I set up mine, with Drafts, Junk and Trash stored in the server, Notes stored in the Inbox, and Sent mail NOT stored on the server. Later we'll make settings that will get your sent mail into the Gmail sent mail folder automatically, so never fear.
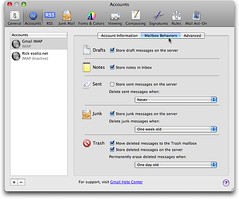
You can also make these settings by choosing the target folder in your mail folder hierarchy, and assigning the folder using the menu Mailbox, Use This Mailbox For.

Setup Junk Mail Processing

Gmail has excellent anti-Virus and Junk mail processing already, so I chose to leave any junk mail that got through in my main mailbox. This works well because Mail.app and Gmail get "confused" when there are multiple Junk mail locations. In Junk settings, I chose to trust the ISP's junk mail headers, and to not mark as Junk if the sender is in my Address Book.
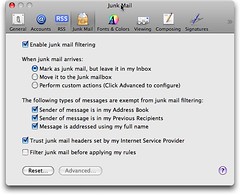
Setup Google Mail Processing

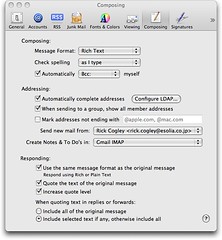
Now you have to do a few things to make your mail go into the correct folders. First, BCC yourself on all messages in Mail.app. This is in Preferences, Composing.
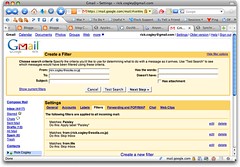
Next in the Gmail interface, set up a Filter to bypass the Inbox for anything that comes from yourself (while viewing the Inbox, click Create a Filter next to the Search the Web button). I created one filter each for both my corporate and private addresses. The filter should be set to match all mails From your address(es), and the Next Step should be to bypass the Inbox and send it straight to the Archive.
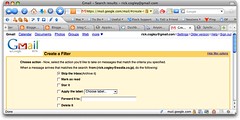
Google's IMAP implementation is different from the true standard. It seems they keep everything in one big folder per person and tag the mail so that it appears to be in certain folders in the web interface. Now, any mail that you send out of Mail.app is BCC'ed yourself, so that mail To: someone From: yourself will also be forwarded to your "private" Gmail address, and acted upon by the Gmail filters you create. The filter will fire, notice that the mail is from yourself, and automatically tag it correctly as sent mail so that it is visible in the correct place. Despite the fact that you are not storing Sent mail on the server, your local Sent Mail folder will still have a copy of the mail when it is sent from Mail.app.

Not to forget, additionally, you have to set up Gmail to use your "corporate" address. Do this in Gmail settings, Accounts tab. I added my corporate address, and verified as directed by Google.

So the Flow Goes

Someone sends mail to you@your.corporate.com, which is forwarded to your private@Gmail account. If it is a virus or spam, Gmail's filters for those will act upon the mail. If it passes through the gauntlet, Mail.app downloads the mail, runs another Spam check and processes any rules you have set, then copies the mail into your Inbox folder. You reply to the mail and Mail.app copies your reply into your local Sent Items folder. Because you have BCC'ed yourself, the reply gets routed to you@your.corporate.com again, forwarded to Gmail, and Gmail's filters act upon it, noticing it is From: you. The mail is automagically copied into the Gmail Sent Mail folder (tagged as Sent).

When you create an email, you choose which email you wish to send from, both of which you entered in Preferences, Accounts, "Email Address", separated by a comma. Your outgoing SMTP server would be your ISP's one or your corporate one depending on your setup. Your BCC address is automatically entered in based on your auto BCC setting. You click send, and Mail.app logs into your outgoing SMTP server to process the send, and the mail is processed into the right IMAP folder as appropriate.

Decision Summary

During this setup, we made the following decisions:

  • Use the IMAP protocol not POP, because IMAP allows you to access your mail from multiple IMAP clients.
  • Use your ISP's SMTP server to resolve the Outlook "on behalf of" problem, and use a Gmail Filter to make sure your mails get put in the Sent Items folder. The Gmail filter will skip the Inbox, and archive the mail from yourself immediately.
  • BCC yourself to make sure the aforementioned filter always fires, putting sent mail in its place.
  • Setup and verify your "corporate" account in Gmail, Settings, Account, so that you can choose From: me@corporate when you compose a mail in Mail.app.

It's a little bit complex, but it is nice to have a robust backend with great anti-virus and anti-spam measures, plus a large amount of storage space, for free. Kudos to Google for giving us such a wonderful service.

Wednesday, January 16, 2008

Apple - MacBook Air

Apple - MacBook Air  - wow! How do they do it?! What an incredibly slim laptop. I like my MacBook Pro because it has the ports I need in it already, but, this is typical Apple pushing (er, forcing?) the envelope by removing the network port and optical drive. Perhaps this will drive WiFi innovation or perhaps Apple has something else up their sleeves?! By the way, TimeMachine now works over wireless too - nice timing!

Update: there are some caveats, of course. One, you cannot change the battery yourself, which means no spares, and is going to be a problem for travelers. Another, there is no network interface card but you can do a USB NIC if you like. Thirdly, the internal hard disk is said to be a bit on the slow side. But, it LOOKS mahvelous!

Tuesday, January 15, 2008

Failed Reinstall of Adobe Creative Suite CS3 - Disk 2?

I installed some software that overwrote some vital portion of Adobe Acrobat, so when I try starting that app, it complains, asking for a reinstall. So, embarking on the obvious course, reinstalling using the "refresh" function of the install DVD, I find out that half way through, the installer prompts for Disk 2, ExtendScript Toolkit. That would be fine, except there is no disk 2! Much frustration and a lot of googling later, I found this Adobe forum post that has the hint that you can mount ExtendScript during the reinstall and all should be well. Get ExtendScript here. Boy, there's just so many problems cited with the Adobe CS3 install, it's a sham(e). Maybe Apple needs to buy Adobe - an announcement during the Jobs keynote tomorrow, perhaps?

Getting Things Done with David Allen himself

Check out this YouTube video of David Allen himself. A good speaker, and self-effacing.


Sunday, January 06, 2008

Convenient "Snippets++" Code Collector Pro

Ed from the RapidWeaver forum tipped me off for CodeCollector Pro. Looks like the perfect little app to collect up snippets of javascripts etc.

Saturday, January 05, 2008

Clarify Colleagues' Knowledge - Consultative Management

In consulting or consultative management, I strongly feel that it's important to make an extra effort to clarify your colleagues' knowledge, to assist them in their job.

During a recent Sarbanes Oxley project, my non-technical colleagues were discussing the technical topics of Windows profiles and disk permissions interchangeably. Non-technical folks' eyes usually glaze over when listening to someone in tech drone on about the details so it's never a good idea to overload with too much info, but I think a bit more information in some cases is beneficial. Specifically, this time I explained that NT profiles by default, govern what "rights" you have on your local computer, storing things like desktop icons, printer info, internet bookmarks or favorites, email configuration, help configuration and so on, and, that the sys admin can make central settings that limit what users can do on their computers.

In this way, profiles are rather application centric. For example, a sys admin can say "group X cannot use the command prompt" and so on. I emphasized that to set up profiles would take some planning, as they are very powerful but complex to plan for. Setting one thing can break others, so the subject should not be taken lightly. In terms of file and folder security, on the other hand, I explained that Windows NT and other NT-based servers (Windows 2000, Windows 2003) use a disk "file system" called "NTFS" which both enables and governs how sys admins can set security for files and folders. Further, PC workstations based on NT - NT 4, Windows 2000, Windows XP - all allow use of NTFS, so the same rules apply to PCs and laptops running those OSs.

For example, if you have a folder x:\finance\private which contains a bunch of sensitive Excel files, you can set up the folder as such:

System Admins: Full
Backup System: Full
Finance Management: Change
Finance Group: Read
Some-Other Group: No Access


... and so on. There are many other points to go over about how sys admins can use user groups to define disk permissions and about how those need to be designed and planned, and other caveats to setting these things up. To summarize, I would stress to:

  • Listen more than you speak, but use your expertise to emphasize critical points.
  • Maintain an awareness of your audience - avoid "tech speak".
  • Actively assist your business colleagues to clarify their business requirements, and try your best to have the technology support those requirements.

Happy consulting!

Very Sexy - Apple Docking Patent Works Perfectly with Ultra-Slim MacBook

Just saw Gizmodo's article on the Apple Docking Patent for a slim notebook that docs inside an iMac. Wow, that's sexy!

Tuesday, January 01, 2008

Mail.app 3.x in Leopard - Rule to Tag Mail as "Expiring" Takes Advantage of Address Book Groups

As a New Year's project, besides biking a lot up and down along the Sakai River on my new Centurion, I decided to try switching from Entourage 2004 and its monolithic mail store file, to the Mail.app that comes with OS/X Leopard and use Gmail IMAP. One thing I have set up in Entourage is a rule that runs an AppleScript to search a long list of sender email addresses from which comes mail I want to mark as "Expiring". These are newsletters, RSS newsfeed updates and other information that I don't necessarily want to keep, but want an easy way to find for later deletion.

Mail.app's rules work fine, but, once you get past 10 or 15 criteria lines inside a given rule, you cannot add more because the panel being used does not scroll as you can see here. I was going to rewrite my original Entourage script that I was triggering for every message:

tell application "Microsoft Entourage"
   
    set theMsg to item 1 of (get current messages)
    set theAddress to the sender of theMsg
    set theAddressString to the address of theAddress
    set theName to the display name of theAddress
    set theSubject to the subject of theMsg
    set theTargetCategory to category "Expiring"
   
    --List of mail addresses to check
    set fromList to {"postmaster@somedomain.com", "news@bigcorp.com", "announcement@garageco.com"}
   
    if fromList contains theAddressString then
        set category of theMsg to theTargetCategory
    end if
end tell

... and try to use this method for all mail that comes in and is processed by Mail.app. However, it occurred to me that I could simply add all senders to my address book, put the ones I want to mark as Expiring in an Address Book group, then run a rule to check that.

Turns out that Address Book is indeed well integrated and there are rules you can use. In addition, to have the ability in Mail.app to "tag" messages like you can do already in Entourage 2004 via its Categories, the excellent MailTags comes to the rescue, so that you can keyword each message you are marking.

Here are the steps:
  • In Address Book, add a group, say, "Expiring".
  • In MailTags preferences in Mail Preferences, add the keyword "Expiring".
  • In Mail.app, open Mail preferences and open the Rules pane. Add a new rule and give it a name like Expires.
  • If "Any" of the conditions is met, choose "Sender is a Member of Group" and the group name "Expiring".
  • Perform the following actions: choose "Set color of message" "of background" or "of text" and a color to indicate that the message is Expiring.
  • Next action: "Set mailtags keyword" then "Add" then "Expiring".
  • Next action: "Stop Evaluating Rules" if appropriate.
  • Save and test.

Because you have the keyword "Expiring" now in the headers of messages that trigger this rule, you can use a smart folder in Mail.app to view all expiring messages and make a human decision on what action to take - delete or archive.