Tuesday, February 23, 2010

Fixing an Unexpected Prompt Hostname in OS X

In Mac OS X, you may have noticed if you use the Terminal that OS X automatically picks up what it thinks your hostname should be and sets it. This is nice, but the problem with it is if any utility uses your hostname to set config files, you'll have a different config file every time.

How to fix a "Strange Hostname" in an OS X Prompt

If you are getting varied prompts that look like this...:

rcogley@em60-123-194-6 ~>

...where what you're expecting is something like this:

rcogley@rickmac ~>

To fix this, you can use scutil. Here's how I did it:

scutil --set HostName "rickmac.esolia.net"

Substitute the rickmac bit with your own hostname and domain and you'll be good to go with a static prompt. Try these also:

scutil --get HostName

scutil --get LocalHostName

scutil --get ComputerName

man scutil

I hope this helps someone. Enjoy!

Monday, February 15, 2010

Aperture 3 Upgrade Observations

Aperture 3 Confirm Faces InterfaceMy upgrade to Apple's Aperture 3 came over the weekend so I upgraded and started letting it analyze faces using the iPhoto-inspired "Faces and Places" feature.

Here's a few observations from the upgrade process and just a little use of the Faces feature.

  • Aperture 3's icons are colorful, compared to its predecessor. I think they still look professional, but they are a little "friendlier" and more iPhoto-like.
  • Aperture 3 itself is just under 1GB in size but the sample library is about 7GB.
  • To use the new features of Aperture 3, you must upgrade your Aperture 2 library. This can take several hours and did for me on a 50GB library.
  • Backup "Vaults" seem to also require a full refresh, probably due to the library upgrade. Vault backups still run in that irritating modal dialog box that pops up and interrupts. Best to freshen Vaults when you don't have to work on anything else, but I still love the ability to have multiple Vaults. Note, Vaults are freshened in serial - it seems to do one, then do the next.
  • Both TimeMachine and Spotlight indexing get kicked into overdrive because they detect upgraded files from the Aperture 3 upgrade activities.
  • With the new Faces feature, you have to train Aperture 3 to use it. If you pick a folder of photos in your library with people you commonly photograph, and spend the time to tell Aperture who is who, you can then use the "Confirm Faces" feature to drag-select vast swaths of matching faces, or, to toggle a face to be "not Jim" or "not Jane". It works better the more you train it, and it's fun to see who it "thinks" you are. Family resemblances can be telling :-). Faces also links to Address Book entries.
  • Aperture 3 is most definitely snappier compared to its previous version, and registers in Activity Monitor as Intel 64-bit. My library uses about 250MB of memory.

I think it's a worthwhile upgrade just for the speed increase.

Friday, February 12, 2010

Set MBR Correctly to Backup Successfully with OS X Time Machine

OS X Disk Utility Partition MapIf you use Time Machine on OS X, you need to ensure your target drive is formatted with the correct Master Boot Record type. Time Machine requires either "Apple Partition Map" (works with PowerPC or Intel but is best for PowerPC) or "GUID Partition Table" (works with Intel).

There are a couple of problems which lead to this requirement biting people on the you-know-where.

  • Pre-formatted drives that will work with a Mac are not often formatted with "Apple Partition Map", but will be recognized by your Mac, lulling you into a false sense of success and security.
  • Time Machine rudely does not warn you that your drive has a problem. It will happily back up for a while, then fail with some not-so-useful error.
  • Re-formatting a drive in the normal way using "Erase" in Disk Utility will just erase the content and not re-do the partition map.

So, when prepping a drive for Time Machine use, you need to use the "Options" button to set the Partition Map.

Formatting a Drive for Time Machine Use

Here's how to set it up.

  1. In Disk Utility, select your new hard drive (the drive, not the partitions below it in the selection tree).
  2. Select the Parition tab, which you can see in the accompanying graphic, and choose the number of volumes from the "Volume Scheme" pop-up menu.
  3. Click "Options", then choose "GUID Partition Table" for an Intel-based Mac or "Apple Partition Map" for PowerPC- or Intel-based Macs. Then click "OK" and "Apply".

I hope this helps someone avoid the trouble I had getting Time Machine working smoothly. Enjoy!

Friday, February 05, 2010

Fixing Slow Snow Leopard Mail

OS X Snow Leopard Mail SMTPMany upgrading Mac users have reported that Mail is "slow" in Snow Leopard 10.6. There are several things you can do to remedy the situation. Here's what you can try, but please make sure you have Time Machine backing up your system, or are running an alternative like SuperDuper! or CarbonCopyCloner.

Reset SMTP Mail

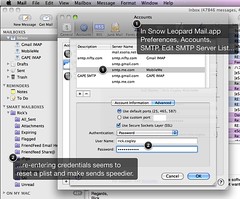
One thing that sharp users observed on Apple's forums was that newly-created Mail accounts were not experiencing the slowness to send, that upgraders were commonly experiencing. You can export your mail, recreate your accounts and re-import everything, but another way to mimic creating a new account is to re-set SMTP credentials. It's a bit voodoo, but it seems to work.

  • In Mail app open Preferences, choose the Account you are having trouble with, and then choose "Edit SMTP Server List" from the "Outgoing Mail Server (SMTP)" drop down, in the Account Information panel.
  • Select the SMTP server you are using, and re-enter its credentials.
  • Click OK to Save.

Do this for all your SMTP servers, and remember you can always use Keychain Access to confirm saved passwords.

Vacuum That Index

Mail keeps an index of your messages in a sqlite database, and you can "vacuum" that index regularly to compact and clean up. This is especially useful if you regularly delete mail, and is well-documented on various Mac-related web sites. Quit mail, then from Terminal, run these commands.

yourhost:~ youruser$ ls -lah ~/Library/Mail/Envelope\ Index

yourhost:~ youruser$ /usr/bin/sqlite3 ~/Library/Mail/Envelope\ Index vacuum;

yourhost:~ youruser$ ls -lah ~/Library/Mail/Envelope\ Index

The bookend "ls" commands just show how large your Envelope Index is in megabytes, so you can see the before and after, when running the vacuum command. The middle sqlite3 command vacuums the index. For reference, recently vacuuming my mail envelope index required about 10 minutes, but reduced its size from about 70MB to about 40MB.

Run Cocktail

And finally for general performance, you should regularly run Cocktail. From Maintain's site:

Cocktail is an award winning general purpose utility for Mac OS X. It is a smooth and powerful digital toolset with a variety of practical features that simplifies the use of advanced UNIX functions and helps Mac users around the world to get the most out of their computers. Cocktail is installed at more than 200 000 computers world wide. The largest part being private individuals, but Cocktail can also be found at large international companies (Puma, Sony), educational institutions (Harvard University, University of Texas) or newspapers (The New York Times, Business Week).

The application serves up a scrumptious mix of maintenance tools and interface tweaks, all accessible via a comprehensive graphical interface. Most of Cocktail's major features are arranged in five basic categories. In addition, a Pilot lets you clean, repair and optimize your system with one click of the button.

Cocktail's Pilot is where you can schedule commands to run. I do a weekly Cocktail run, to reset disk permissions and delete caches. It seems to keep things running smooth, but you should note that for certain system cache resets, you should restart the system afterwards.

At any rate, I hope the above information helps someone out. Enjoy!