Apple obviously works hard to make things as easy as possible for users, but sometimes in their zeal for simplicity, technical things that should be represented simply in the GUI, are actually made more difficult and opaque.
One such example is setting up 802.1q VLANs in OS X Lion 10.7. In System Preferences, Network, you can use the gear icon at the bottom of the interface list, to Manage Virtual Interfaces, but you can only link a vlan you create there (or in the CLI) to the main Ethernet interface, and not to any secondary interface you create. However, it is indeed possible to create the vlan on the main interface, then give it the IP address you require.
How to Setup an 802.1q Tagged VLAN in OS X 10.7, with a Manual IP Address
The reason I needed to have a tagged VLAN, is my switches' management interface is on a tagged VLAN. We are using an untagged VLAN as the general VLAN in our network, because you never know what systems will not support 802.1q tagging, and, you can have only one untagged VLAN in a switch infrastructure. (That makes sense if you think about it. How could you have two untagged VLANs, when the point is separation.) We wanted the security of a separate VLAN, for infrastructure management functions.
So my goal was -
- to have a single NIC working for all the networks I need.
- to be able to connect to our standard untagged internal VLAN where we have servers and printers, on 10.81.1.0.
- to be able to connect to our tagged management VLAN which is the only way to manage our switches, on 10.81.254.0.
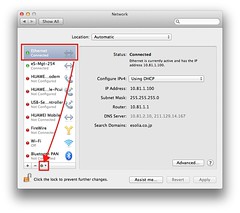
Connecting to the standard untagged internal VLAN is easy. It is the "Ethernet" interface listed in System Preferences Network, and connects via DHCP. The steps to make the third bullet point work, were as follows -
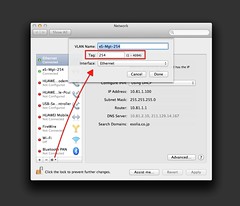
First, open System Preferences, Network, then use the gear icon at the bottom of the list of interfaces, to see a submenu, that has "Manage Virtual Interfaces".

Click on "Manage Virtual Interfaces" and use the plus button to add the VLAN interface, entering a name, and the correct VLAN tag number. In this example, it is 254. At least on my MacBook Pro, I was able to select only the one physical NIC - Ethernet - to bind the VLAN to.
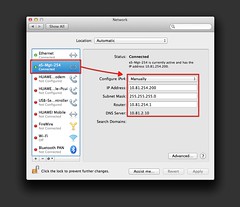
After you click Done, you will see the VLAN interface listed in the main list of interfaces. You then select this, and change DHCP to Manual configuration, and set it up as a normal Network interface. The difference is, this interface has the 802.1q tag on all its packets.
Once this is set up, you will be able to communicate with other devices, like switches, servers, or storage, that have the same VLAN tag.
I hope this information helps someone. Enjoy!


